When building modern React applications, managing the state becomes increasingly complex as the app grows. To solve this problem, developers have long used state management libraries like Redux. Redux, while powerful, can be verbose and difficult to set up, especially for smaller applications. This is where Redux Toolkit comes in—a set of tools and best practices designed to simplify Redux usage, making it easier for developers to manage application state.
In this blog, we'll dive into Redux Toolkit and explore how it simplifies state management in React applications. We'll also understand how data flows within a Redux-powered application.
What is Redux Toolkit?
Redux Toolkit (RTK) is the official, recommended way to write Redux logic. It simplifies Redux setup, reduces boilerplate code, and comes with additional powerful utilities. While traditional Redux requires you to write reducers, actions, action creators, and more manually, Redux Toolkit abstracts a lot of this work to help you focus on your application logic.
Key Features of Redux Toolkit:
createSlice– A function that combines the reducer and the actions into one place, making it easier to manage state and define the logic for state changes.configureStore– A function that simplifies store creation, automatically setting up middleware and the Redux DevTools extension.createAsyncThunk– A utility to handle async logic (such as API calls) in Redux actions, reducing the need for manual action creators and reducers.- Immutability and Immer – Redux Toolkit uses Immer internally, which simplifies the process of updating state in a mutable way but still ensures the state remains immutable.
Redux Toolkit Workflow
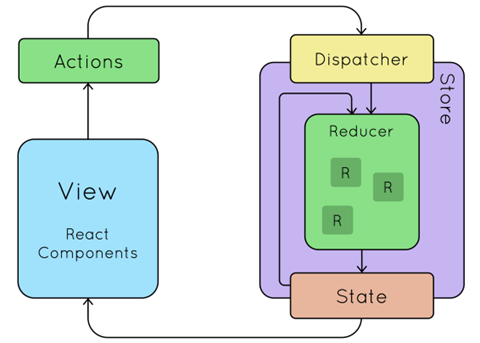
The workflow in Redux Toolkit revolves around three core concepts: State, Actions, and Reducers. These work together in a data flow that makes state management predictable and traceable.
1. State (Store)
The store is the heart of any Redux-based application. It holds the global state of your application, which can be accessed by any component that subscribes to it.
To create the store with Redux Toolkit, we use the configureStore function.
import { configureStore } from '@reduxjs/toolkit';
import myReducer from './mySlice';

const store = configureStore({
  reducer: {
    myState: myReducer
  }
});
Here, myReducer is a slice of the state defined using createSlice. The store can hold multiple slices of state.
2. Actions
Actions in Redux are used to describe what happened in the application. Instead of manually writing action types and creators, Redux Toolkit simplifies this with the createSlice function. This function automatically generates actions based on the reducer names.
import { createSlice } from '@reduxjs/toolkit';

const mySlice = createSlice({
  name: 'myState',
  initialState: {
    value: 0
  },
  reducers: {
    increment: (state) => {
      state.value += 1;
    },
    decrement: (state) => {
      state.value -= 1;
    }
  }
});

export const { increment, decrement } = mySlice.actions;
export default mySlice.reducer;
In this example, Redux Toolkit automatically creates the increment and decrement action creators for us. The actions are dispatched to update the store.
3. Reducers
Reducers are functions that determine how the state should change based on the dispatched actions. In Redux Toolkit, reducers are defined within the createSlice function, making it easier to manage the state without needing separate files for actions and reducers.
const mySlice = createSlice({
  name: 'myState',
  initialState: {
    value: 0
  },
  reducers: {
    increment: (state) => {
      state.value += 1;
    },
    decrement: (state) => {
      state.value -= 1;
    }
  }
});
The increment and decrement functions are reducers that modify the state based on the action dispatched.
Data Flow in Redux Toolkit
The Redux data flow is unidirectional, meaning that data flows in one direction through the system. Understanding this flow is crucial to understanding how Redux manages state.
Here’s how data flows in a typical Redux-based React application:
- Action Dispatch: When a user interacts with the application (e.g., clicks a button), an action is dispatched. For example, when the user clicks a button to increment a counter, an action of type
incrementis dispatched. - Action Handlers (Reducers): The dispatched action reaches the reducer. The reducer checks the action type and updates the store state accordingly. In the case of an increment action, the state is updated by incrementing the counter value.
- Updated State: Once the state is updated by the reducer, the new state is automatically reflected in the React components that are connected to the Redux store. This is achieved through
useSelectorhooks orconnectfromreact-redux. - UI Update: Once the state is updated, the React components re-render with the new state. Since the Redux store is the single source of truth, all components connected to it automatically get the updated data.
This entire process ensures that the application’s state is predictable, centralized, and easily debugged.
Example: Counter Application with Redux Toolkit
Let's look at a simple counter app using Redux Toolkit to understand how the data flows:
Step 1: Setting up the slice
import { createSlice } from '@reduxjs/toolkit';

const counterSlice = createSlice({
  name: 'counter',
  initialState: {
    value: 0
  },
  reducers: {
    increment: (state) => {
      state.value += 1;
    },
    decrement: (state) => {
      state.value -= 1;
    }
  }
});

export const { increment, decrement } = counterSlice.actions;
export default counterSlice.reducer;
Step 2: Creating the store
import { configureStore } from '@reduxjs/toolkit';
import counterReducer from './counterSlice';

const store = configureStore({
  reducer: {
    counter: counterReducer
  }
});

export default store;
Step 3: Connecting the store to React with Provider
In your index.js, wrap your root component with the Provider to give access to the Redux store:
import React from 'react';
import ReactDOM from 'react-dom';
import { Provider } from 'react-redux';
import App from './App';
import store from './store';

ReactDOM.render(
  <Provider store={store}>
    <App />
  </Provider>,
  document.getElementById('root')
);
Step 4: Using Redux state in a component
import React from 'react';
import { useDispatch, useSelector } from 'react-redux';
import { increment, decrement } from './counterSlice';

const Counter = () => {
  const dispatch = useDispatch();
  const count = useSelector((state) => state.counter.value);

  return (
    <div>
      <p>Count: {count}</p>
      <button onClick={() => dispatch(increment())}>Increment</button>
      <button onClick={() => dispatch(decrement())}>Decrement</button>
    </div>
  );
};

export default Counter;
Step 5: The Data Flow in Action
- The user clicks the "Increment" button.
- The
incrementaction is dispatched to the Redux store. - The store updates the state via the
incrementreducer. - The updated state is passed to the
Countercomponent viauseSelector. - The component re-renders with the new count value.
Conclusion
Redux Toolkit makes managing state in React applications much simpler by reducing boilerplate code and improving the developer experience. By centralizing the application state and using a predictable unidirectional data flow, Redux Toolkit ensures that the state is always in sync with the UI, making applications more maintainable and easier to debug.
In this blog, we explored the concepts behind Redux Toolkit, its key features, and how data flows within a Redux-powered application. By using Redux Toolkit, developers can manage complex state logic with minimal effort and improve the performance and scalability of their React apps.
React Context API Notes
The React Context API is a powerful feature that allows for state management and data sharing across the component tree without the need for prop drilling. It is particularly useful for global state that needs to be accessed by multiple components.
Key Concepts
- Context:
- A way to pass data through the component tree without having to pass props down manually at every level.
- Context can be used to share values like themes, user authentication, language preferences, etc.
- Creating a Context:
- Use
createContext()to create a new context. - Example:
import { createContext } from 'react';
export const ThemeContext = createContext();
- Provider:
- A component that provides the context value to its descendants.
- It takes a
valueprop, which represents the data that will be shared. - Example:
<ThemeContext.Provider value={{ theme, toggleTheme }}>
{children}
</ThemeContext.Provider>
- Consumer:
- A component that consumes or accesses the context value.
- You can use the
useContexthook or theContext.Consumercomponent. - Example using
useContext:
import { useContext } from 'react';
import { ThemeContext } from './Context';
 const SomeComponent = () => {
const { theme, toggleTheme } = useContext(ThemeContext); // Use theme and toggleTheme here
 };
- useContext Hook:
- A React hook that allows functional components to subscribe to context changes.
- It takes a context object (created by
createContext()) and returns the current context value. - Example:
const value = useContext(ThemeContext);
- Example Usage:
- In the provided example, a
ThemeContextis created, which holds athemestate (light or dark) and a functiontoggleThemeto switch between the two. - The
Contextcomponent usesThemeContext.Providerto makethemeandtoggleThemeavailable to any child component. - Child components can consume this context using the
useContexthook to read the current theme and change it.
Benefits of Using Context API:
- Avoid Prop Drilling: Prevents the need to pass props through multiple levels of components.
- Global State Management: Simplifies managing global state and makes it accessible throughout the app.
- Improved Readability: Helps keep components cleaner and more focused by separating state management from UI logic.
Considerations:
- Performance: Be cautious with frequent updates to context values, as it can cause re-renders of all consuming components. Use memoization or split contexts to optimize performance if needed.
- Complex State: For very complex state logic, consider using other state management libraries like Redux or MobX, as they may be better suited for that purpose.
Conclusion
The React Context API is a powerful tool for managing global state and sharing data across components without the hassle of prop drilling. By creating context, using providers, and consuming context values with useContext, developers can build cleaner and more maintainable React
Why Redux or Redux Toolkit over Context API?
- Better for Large-Scale State Management:
- Context API is great for small to medium applications, but Redux excels in managing complex and large global states, especially when the app grows bigger.
- Performance:
- In Context API, every component using the context re-renders when the context value changes, which can lead to performance issues.
- Redux uses selectors and optimizations to minimize unnecessary re-renders.
- Features:
- Redux Toolkit comes with powerful features like
createSlice,createAsyncThunk, and built-in middleware, which make state management simpler and efficient. - It also supports time travel debugging and easy integration with DevTools.
- Middleware Support:
- Redux has robust middleware support (like
redux-thunkorredux-saga) for handling side effects (e.g., API calls), which isn’t built into Context API.
- Scalability:
- For larger apps with many components and complex state logic, Redux provides better organization and scalability compared to Context API.